 How do I create Reports in PowerBI?
Thereforeā¢ can send data to Power BI, where the data can be visualized. Power BI offers numerous tools to create complex reports. These reports can be saved to a Power BI Dashboard, which can be then be displayed in the Thereforeā¢ Navigator.
Part 1: Setting Up Power BI Security and Connection Before data can be sent to Power BI, the security settings in Portal Azure must be configured accordingly on a company wide level. This requires advanced administrator permissions.
1.Create a client app in your Azure Tenant (Portal Azure) with the scopes below:
2.Create an Application Secret for the application and keep it. Additionally copy the application client id and the Tenant Id of the Azure Tenant.
3.Create a new security group in Azure AD and add the Service Principal of the newly created application:
4.Login to your PowerBI System (you must be admin) and enable access by Service Principals (in Settings): (Powerbi.microsoft.com >Settings > Admin Portal).
5.In PowerBi.microsoft.com Create a new Workspace or access an existing one and select the "..." and select "workspace Access":
6.Then add the service principal for the application to the new workspace as Admin:
7.Extract the Workspace Id from the URL when accessing it - unfortunately there does not seem to be a better to way access this information for now:
8.This should be sufficient to allow the application to upload data to Power BI. New configuration for Power BI Uploads. Enter data in Therefore Solution Designer > Reporting Node > Power BI. Right click on āPower BI Folderā and select āSettingsā. Enter all information in the dialogue.
9.The data can now be sent from Thereforeā¢ to Power BI.
Part 2: Send Thereforeā¢ Data to Power BI 1.Right Click on Power BI Folder (under the Reporting Node in the Solution Designer). Click āNew Data Setā. 2.Select a name for the data set. (This is the name that will appear in the Power BI interface). 3.Select New Index Data upload (for information from a Therefore Case or category) or New Workflow Data upload. Note: Categories must have decimal fields and date fields. Select which data fields should be uploaded to Power BI, and optionally select how often the data is refreshed in Power BI. 4.Once selected, the data is immediately uploaded to Power BI.
Part 3: Visualize Data and Create Dashboard in Power BI 1.Logon to your Power BI account (powerbi.microsoft.com) 2.You will now be able to see the dataset you just uploaded to Power BI under My Workspace. 3.Select the dataset and create a report using Power BI tools. Save the report. 4.Pin the report to a dashboard. Note: multiple reports from multiple datasets can be saved to a single dashboard.
Part 4: Displaying the Power BI Dashboard in Thereforeā¢ 1.Open the dashboard you want to visualize in the Thereforeā¢ Navigator. Select Share.
2.Copy the Dashboard link from the Share Dashboard menu.
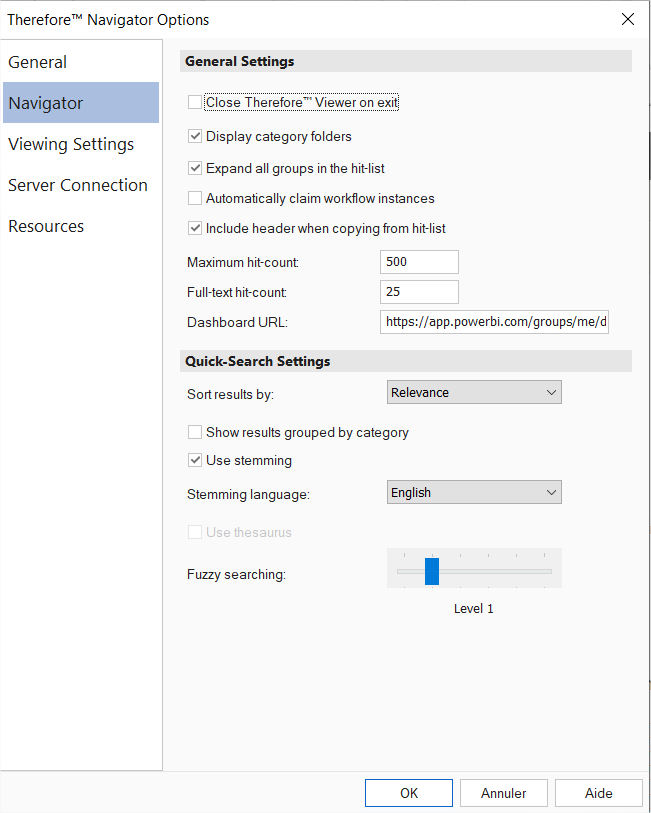
3.Open Thereforeā¢ Navigator. File > Navigator > Dashboard URL. Copy the URL of the Power BI Dashboard into the Dashboard URL field under Therefore Navigator Options.
4.Close and re-open the Navigator. The Power BI Dashboard is now visible when opening the Navigator. Furthermore, the Dashboard can be displayed at any time by clicking File > Dashboard.
|
|---|
Ā© 2024 Therefore Corporation, all rights reserved.


