|
Connection |
Scroll |
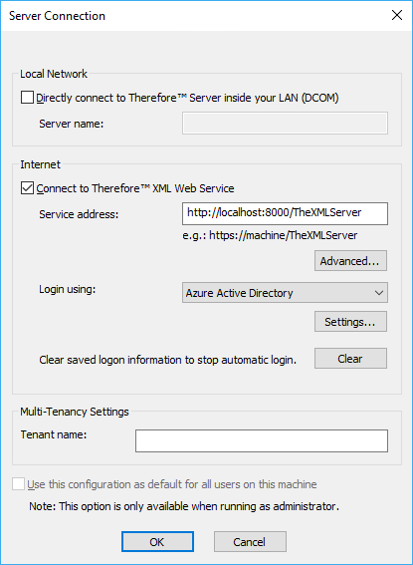
Therefore™ applications need to connect to a Therefore™ Server in order to perform their operations (e.g. search for documents). By default the Therefore™ applications try to connect to the Therefore™ Server using the local network.

Local Network
Directly connect to Therefore™ Server inside your LAN (DCOM)
Enable this type of connection inside a Local Area Network (LAN) using DCOM.
Server Name:
Enter the DNS name or its IP Address. If the Therefore™ Server name is empty, the default Therefore™ Server from the Windows Registry will be used.
Internet
Connect to Therefore™ XML Web Service
If this option is selected, the connection will be established to the Therefore™ Server using the Internet.
Service Address:
Enter the URL for the Therefore™ XML Web Service.
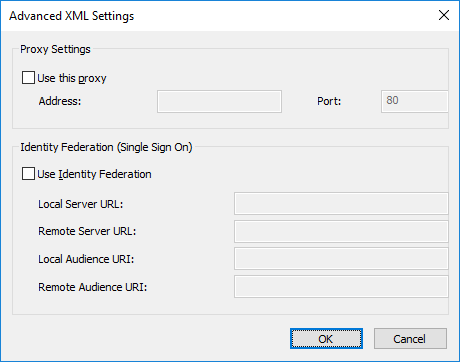
Advanced...
Opens the Advanced XML Settings dialog.

Use this proxy
In case you want to use a different proxy server, select the checkbox Use this proxy and type in the DNS or IP Address of the Server and the connecting Port number.
Use Identity Federation
A connection can be made to the Active Directory Federation Service (ADFS).
Login using
Select an authentication method to log into Therefore™ (e.g. Azure Active Directory or Okta).
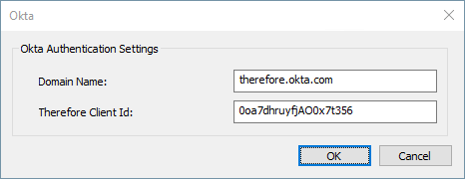
Settings
Opens the authentication settings dialog of the selected login method
Domain Name Enter the Domain Name for Okta.
Therefore Client Id Enter the Therefore™ Client Id for Okta. |
Therefore Client Id Enter the Therefore™ Client Id for Azure Active Directory.
|
|---|---|
|
|
Clear
Clears saved login information to stop automatic login for clients that connect via XML Web Service.
Multi-Tenancy Settings
Tenant Name:
ONLY for MULTI-TENANT systems. Enter the name of the tenant.
Use this configuration as default for all users on this machine
If this checkbox is selected, the settings will be used for all future Therefore™ Navigator users on this computer.
|
To enable this setting, Navigator must be run as administrator. To do this, right click on the program icon and choose Run as administrator from the context menu. |


