
|
Configuring SMTP Connection to Office 365 |
Scroll |
This article contains instructions on how to configure Thereforeā¢ server to use Office365 for sending of emails.
Create a Registered Sendmail App in Microsoft Entra ID
In this tutorial you will be registering an App in Microsoft Entra ID and giving it sufficient permissions to access certain APIs. Specifically, API permissions to access Exchange allowing Thereforeā¢ to send emails.
After registering your App you will have an ID to identify your it, alongside other settings. These settings are required in your application and will be used to check for permission to send e-mails.
|
Pre-requisites: •Access to the Microsoft Azure portal for your tenant. •An account with sufficient permissions to modify settings within your tenant (Global Administrator privileges). |
Azure Configuration
1.Open a web browser, navigate to the Microsoft Azure Portal (https://portal.azure.com/) and login.
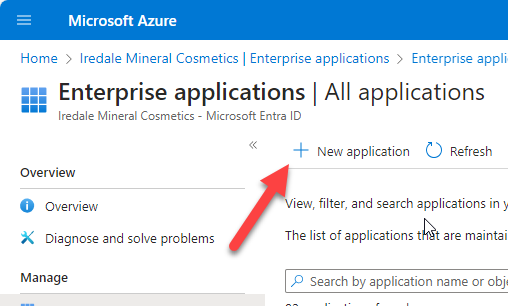
2.On the left-hand side, navigate to 'Enterprise Applications' and click 'New Application'.
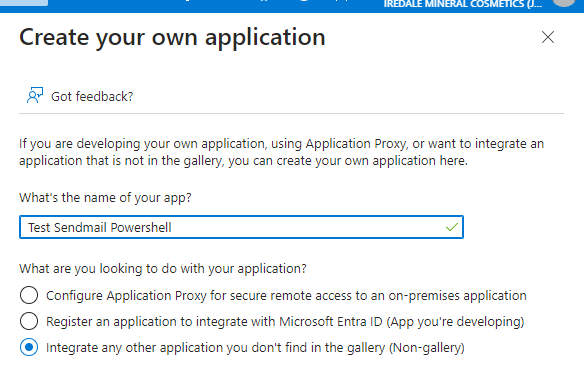
3.Give your Application a name, select non-gallery as the type and click 'Create'.
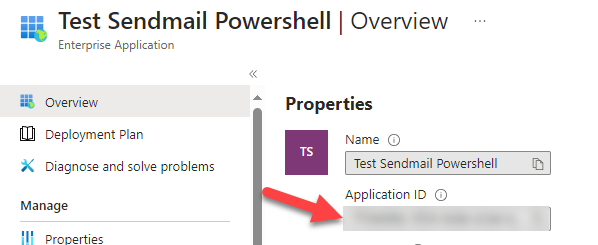
4.Take a note of the 'Application ID' for your application.
5.Click on the 'Permissions' tab under 'Security' and then click on the 'App Registrations' link to get to the API permissions page.
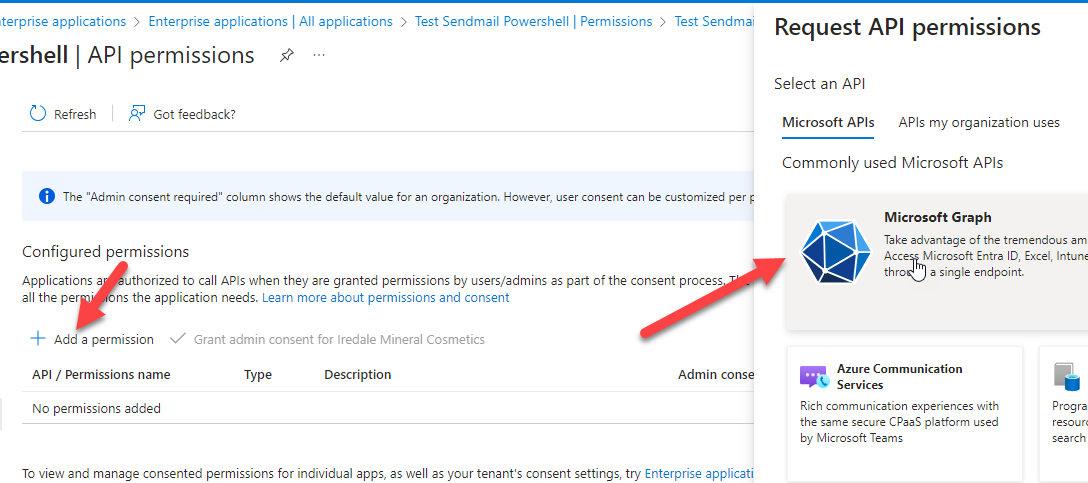
6.Click 'Add a permission' and select 'Microsoft Graph'.
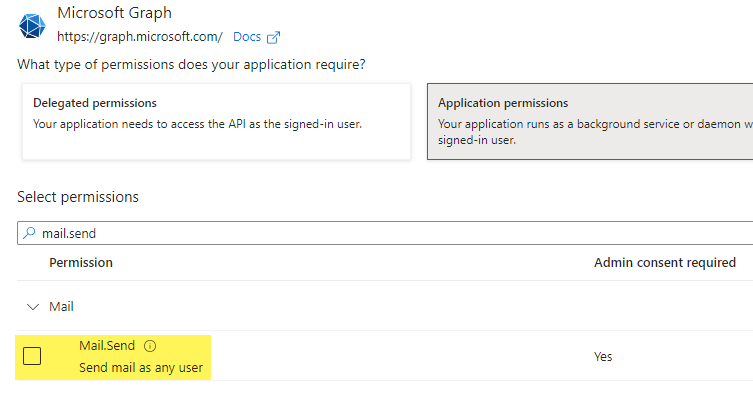
7.Select 'Application Permissions', type in 'Mail.Send' add the permission.
|
Note: This gives the application the ability to send as any mailbox on your tenant. Below in this tutorial there will be steps to limit this to a specific group. |
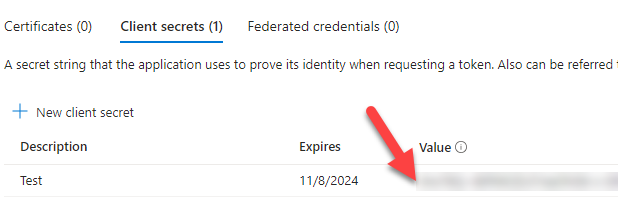
8.Click on 'Certificates and Secrets', add a new client secret and copy what is under the 'Value' column. You will need this value later, please store it safely.
Limiting Application Permissions
The best way to limit the permissions of the Mail.send application is by configuring an Application Access Policy. This policy does the following:
•Defines 'deny' or 'allow' access
•Covers one or many 'Microsoft Entra ID' applications
•Applies to Exchange Web Services and Microsoft Graph API calls made to mailboxes for members of a mail-enabled security group or individual users
Once this policy is configured, we recommend applying it to a mail-enabled security group, and controlling user access by adding to or removing from that group.
1.Create your mail-enabled security group. This process will differ based on your environment.
2.Add the desired mailboxes to the new security group you created. The 'sendmail' application will be able to send as any mailbox in this group.
3.Connect to Exchange Online PowerShell. The Exchange Online PowerShell module is required for this. For more information about this module, please see the link below:
Learn Microsoft - About the Exchange Online PowerShell module
Connect-ExchangeOnline -UserPrincipalName exchangeadmin@onmicrosoft.yourdomain.com
4.Next, you will need to add your application access policy.
New-ApplicationAccessPolicy -AppId XXXXX-XXXX-XXXX-XXXX-XXXXXXXXXXX -PolicyScopeGroupId SendMailPowershell@tictactech.net -AccessRight RestrictAccess -Description "Restrict access to app allowed to send e-mail using the Graph SendMail API"
This policy applies only to 'AppId' (Retrieved from the overview tab under enterprise applications). It allows access only to mailboxes that are members of the 'SendMailPowershell' security group. If you attempt to send as any other mailbox, the 'SendMail' API will return a 403 error.
5.Test the Application Access Policy with the following command:
Test-ApplicationAccessPolicy -Identity user1@tictactech.net -AppId XXXXX-XXXX-XXXX-XXXX-XXXXXXXXXXX
Thereforeā¢ Configuration
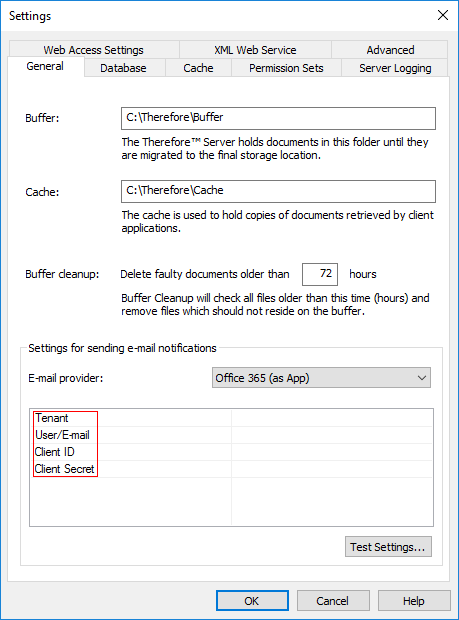
1.Set the value for 'Tenant'. You may find the tenant name of an Entra ID domain through either the Azure Portal or PowerShell.
Using the Azure Portal:
a.Log in to the Azure Portal with your administrator account.
b.Navigate to Microsoft Entra ID.
c.Find your Tenant information in the 'Overview' page. You will see your 'Tenant ID' and 'Primary Domain' on this page. The tenant name is the domain name used in your Microsoft Entra ID.
Using PowerShell:
a.Install and Connect to the Microsoft Entra ID Module by running the following commands:
Install-Module AzureAD
Connect-AzureAD
b.Retrieve the Tenant Name by running the following command once you are connected:
Get-AzureADTenantDetail
The output will include the tenant domain name.
2.Set the value for 'User/E-mail': enter the e-mail address of a user from the Microsoft Entra ID domain who has rights to send e-mails.
3.Set the value for 'Client ID': this will be the 'Application ID' from step 4 of the Azure Configuration section of this tutorial.
4.Set the value for 'Client Secret': this will be the value noted down during step 8 of the Azure Configuration section of this tutorial.

