|
Manage Settings |
Scroll |
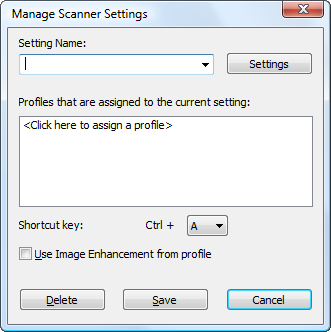
Scanners do not all have the same pallet of settings. For example a DR-9080C has the ability to scan "Extra long pages". It is possible to use scanner specific settings in the Capture Client, it is also possible to assign specific scanner features to a Capture Client profile. This is done by entering a new setting name and then clicking on Settings. This displays a dialog with settings specific to the selected scanner. These settings can then be changed and clicking OK will assign them to the saved setting. The setting can now be saved and will appear in the Setting drop-down list on the ribbon menu. This setting can also be assigned to a profile by clicking on <Click here to assign a profile>. From this point on, whenever the assigned profile is selected, these scanner settings will automatically be selected in the Setting drop-down list. Where specific settings are used for scanning these will take precedence over those set in the profile wizard.
|
By default, settings are user specific since they are saved locally in the "Capture" folder. |

Setting Name
Either choose an existing saved setting, or enter a name for a new setting.
Profiles that are assigned to the current setting
Profile(s) can be assigned to the current setting. This means that when the profile is selected the configured scanner settings are loaded and used instead of the profile scanner settings.
Settings
Opens a dialog with scanner settings specific to the selected scanner.
Shortcut key:
A shortcut key for activating a setting.
Use Image Enhancement from profile
If this is selected, then in addition to the currently select scanner settings, any image enhancement settings from the selected profile are applied.
Delete
A setting can be deleted.
Save
A setting can be saved and will then appear in the Scan menu.

