
|
Export Document |
Scroll |
|
This task can be used to automatically export index data (in XML format), and/or a document, to the file system. Documents can be exported as PDF, PDF/A-1b, Multi-Page TIFF or left in the original format. |
Basic Configuration
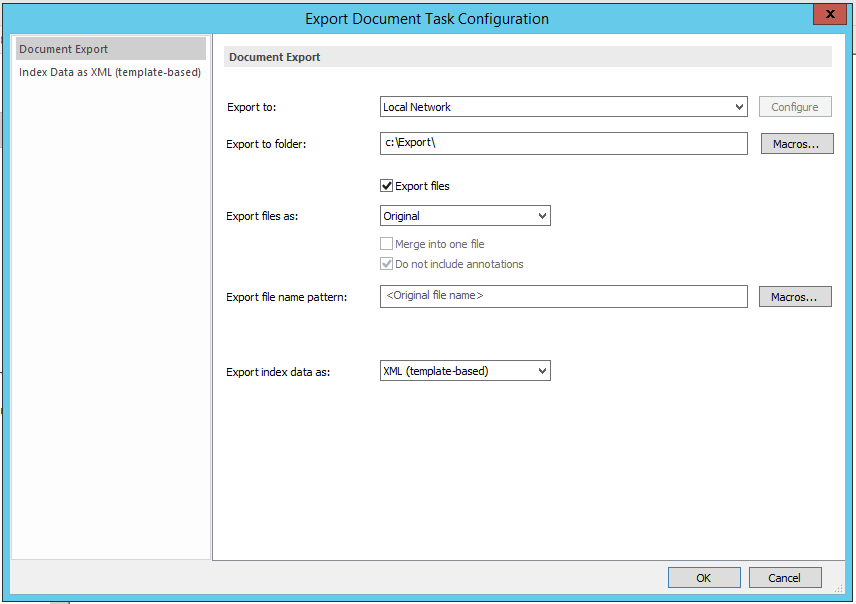
Export To:
Export the document to the selected destination chosen from the drop-down list (FTP server or SFTP server) rather than the local file system. This FTP or SFTP server can be configured by clicking on the 'Configure' button.
Export to Folder:
Specify the folder with full path on the local or cloud file system where the exported files will be saved. Workflow and index data macros can also be used to create data-dependent folder structure. The export folder(s) will be created automatically by the export process.
Export files:
Select the checkbox to enable the document files to be exported. When it is not checked, then only the index data will be exported.
Export file as:
The document files can either be converted to another format or left as original. Available formats are: PDF, PDF/A-2b , Multi-Page TIFF.
Merge into one file
If a format other than Original is chosen, and this checkbox is selected, then all files within the Therefore™ document will be merged into a single file (PDF or multi page TIFF).
Do not include annotations
PDF annotations will not be exported with the document files when the option is activated.
Export file name pattern:
Enter the file name pattern for the exported document files (default setting is the original file name). Macros... button can be used to define data-dependent, descriptive or unique file names.
|
Note: Unique file names are not necessarily guaranteed to work. |
Configure (S)FTP Connection dialog (when clicking 'Export To'):
Export the configuration to the selected server type chosen from the drop-down list (FTP server or SFTP server) rather than the local file system. This FTP server or SFTP server can be configured by clicking on the highlighted Configure option.
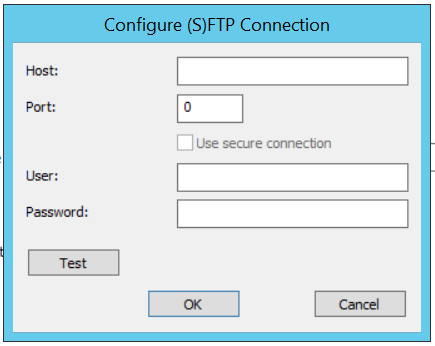
Host:
The host name or IP address of the (S)FTP server.
Port:
The port number to be used.
Use secure connection
Check this box to use an explicit FTPS connection. Implicit FTPS, SFTP, and other secure protocols are not currently supported.
User:
The user name for connecting to the (S)FTP Server.
Password:
The password for the user name chosen above.
Test:
This will test the (S)FTP connection using the current credentials. A dialog will be shown if the connection is successful.
Export to Folder:
Specify a pathway on the local or cloud file system for the saved task configuration. Workflow and index data macros can also be used to create unique file names.
Export file as: The document can either be converted to another format or left as original. Available formats are: PDF, PDF/A-1b, Multi-Page TIFF.
Merge to one file
If a format other than Original is chosen, and this checkbox is selected, then all files within the Therefore™ document will be merged into a single file.
Do not include annotations
PDF annotations will not be exported with the file when the option is activated.
Specify a naming convention used to export the document with a custom file name. Workflow and index data macros can also be used to create unique file names. Note that any invalid characters are automatically replaced with an underscore in the file name.
Select from the list of export file options (including, XML, JSON and CSV).
Meta Data as XML
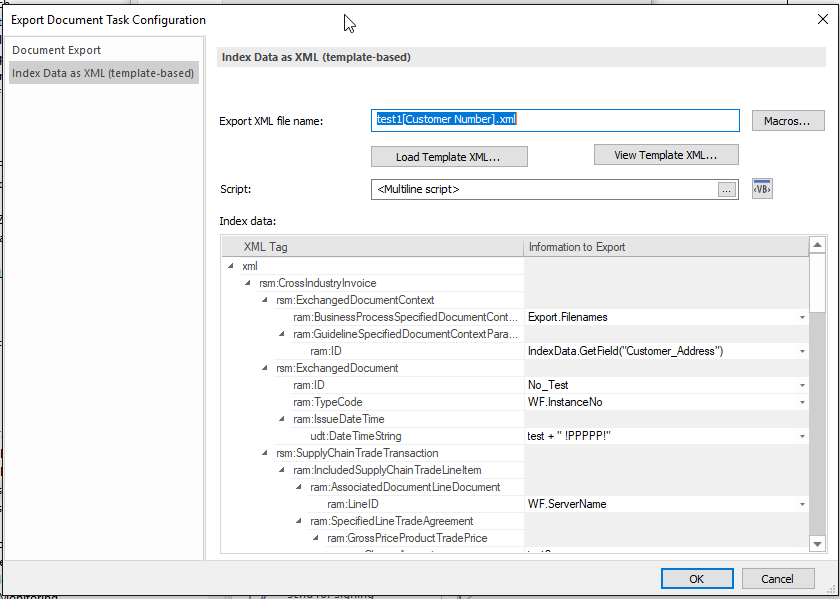
Export XML file name:
Specify the path and name for the XML file. Index Data Fields and Workflow macros, for example, [@InstanceNo] can be added via the Macros... button to create unique file names.
The index data that should be exported can be specified. By default all index data is exported, but deleting a tag will set it to <do not export>. The names of the XML tags can also be edited to suit.
|
•The order of the XML tags is not fixed, as such it should not be relied on for future use after the export. •To only export index data and not the actual document, delete the Files (Root Tag) and the File tag. •To only export the document without an accompanying XML, delete all the XML tags and enter the folder path into the Export XML file name (e.g. c:\temp\export\). |
Meta Data as JSON
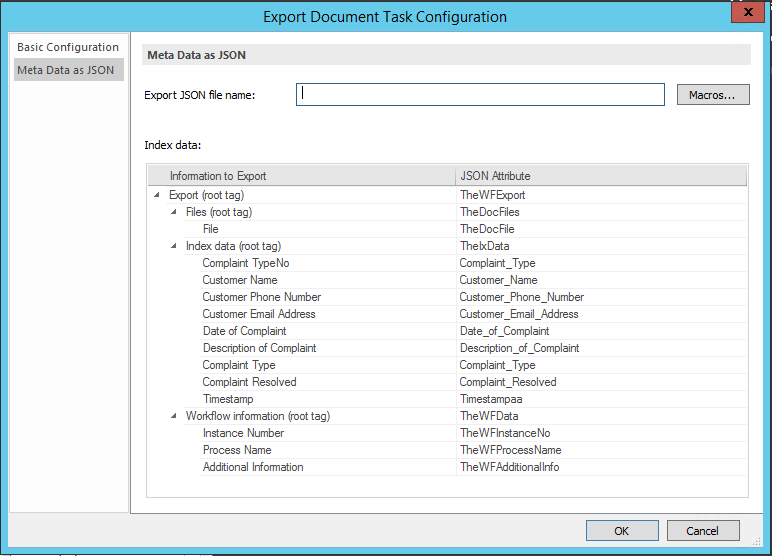
Export JSON file name:
Specify the path and name for the JSON file. Index Data Fields and Workflow macros, for example, [@InstanceNo] can be added via the Macros... button to create unique file names.
The index data that should be exported can be specified. By default all index data is exported, but deleting a tag will set it to <do not export>. The names of the JSON tags can also be edited to suit.
|
•To only export index data and not the actual document, delete the Files (Root Tag) and the File tag. •To only export the document without an accompanying JSON, delete all the JSON tags and enter the folder path into the Export JSON file name (e.g. c:\temp\export\). |
Index Data as CSV
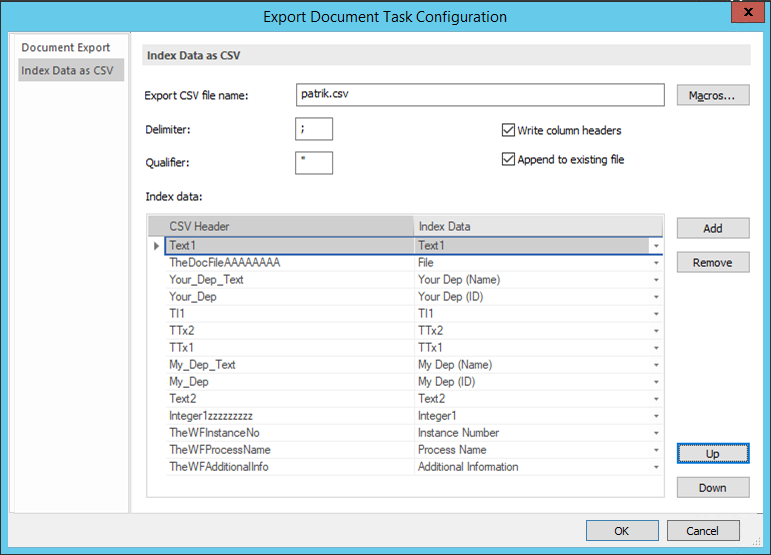
Export CSV file name:
Specify the path and name for the CSV file. Index Data Fields and Workflow macros, for example, [@InstanceNo] can be added via the Macros... button to create unique file names.
Delimiter:
Separates index fields using a chosen character as the delimiter (e.g. , . or ; etc).
Qualifier:
Defines each individual index field value between a selected set of characters (e.g. " or ' etc).
Write column headers
Include column headers in the exported CSV file.
Append to existing file
The new file will be added to the existing document.
Index data
The index data that should be exported can be specified. By default all index data is exported, but deleting a tag will set it to <do not export>. The names of the CSV tags can also be edited to suit.
|
•To only export index data and not the actual document, delete the Files (Root Tag) and the File tag. •To only export the document without an accompanying CSV, delete all the CSV tags and enter the folder path into the Export CSV file name (e.g. c:\temp\export\). •Index filed data can be added or removed using the Add and Remove buttons. •The order of the index field data can be configured using the Up and Down direction buttons. |
Index Data as XML (template-based)
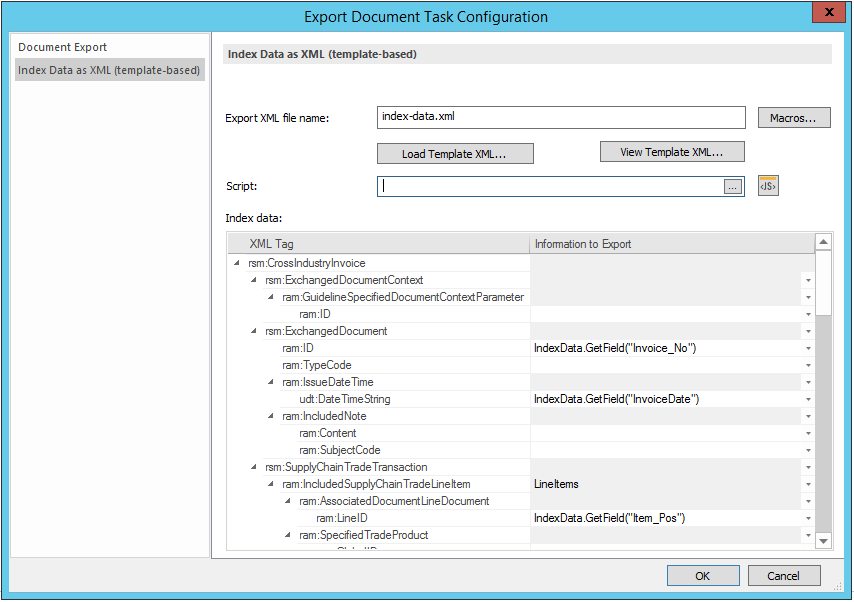
Export XML file name:
Specify the name for the XML file which will contain the exported index data. The Macros... button can be used to define data-dependent, descriptive or unique file name.
|
Note: Unique file names are not necessarily guaranteed to work. |
Load Template XML...
Load the XML-template into the Index Data assignment table.
View Template XML...
View and modify the XML-template in the Notepad application.
Script
A initialization script can be created, which will be executed before the execution of the field assignments. Also, variables and functions could be defined here that will be available for the assignment scripts.
Index Data:
Specify how the XML template will be filled with index data, that is, how the actual export-XML will be generated from the template. Scripts returning a certain value (typically: an index field value) can be created here and assigned to the “leaf” tags of the XML template. During export, these “leaf” tags will be filled with the assigned script result values.
|
When an assignment script returns an array of values, e.g. when the script returns table index field column values, then the assigned “leaf” tag will be repeated in the resulting XML, as many times as the element count in the array. It is possible to enlarge the repetitive XML part from “leaf” tag to a whole sub-tag structure by assigning accordingly from a table field name to a non-leaf tag. |


